I haven’t really documented the Node-RED flow used for the robot arm anywhere, so this post will try to rectify that.
Node-RED is run on a Raspberry Pi and used as the hub in the process of controlling the robot arm from a client either ‘web’ or Scratch.
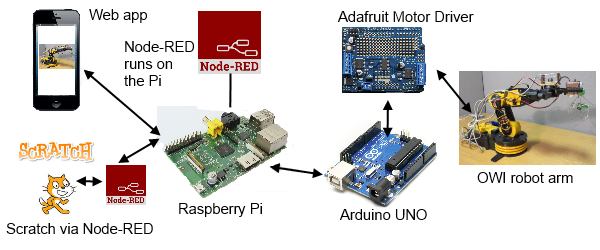 Node-RED starts at boot time and co-ordinates the flow of data to and from the MessageSight broker and the Arduino that is connected to a Pi USB port.
The flow consists of two workspaces, ‘Main flow‘ and ‘Testing and Debug’. Clicking the Main flow link will open a Node-RED export json file of all nodes on that workspace (The testing workspace just contains some inject and debug nodes used during development)
The main part of the flow is shown below, each of the nodes will be explained.
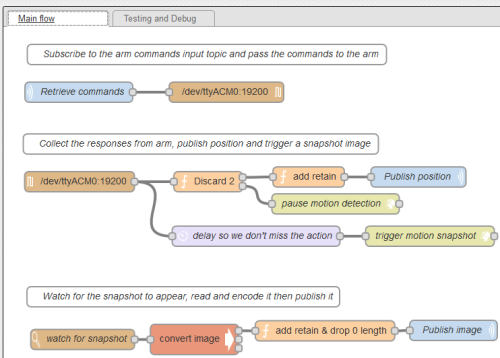
3 comment blocks in the flow allow for some basic documentation within Node-RED itself.
Starting from top left. The MQTT node ‘Retrieve commands’ subscribes to the <stem>/input topic on the MessageSight broker. (In this case stem is a part of the topic tree relevant to this application)
Output from the MQTT node is passed directly to a ‘serial out’ node that is connected to /dev/tty/ACM0. This is the where the Arduino serial interface appears. The Arduino takes the command and actions it as described in the previous post.
Next we have a ‘serial in’ node also connected to /dev/tty/ACM0, this receives all of the responses back from the Arduino. The flow splits here.
The ‘Discard 2’ function node contains the following code and the comments explain its reason for existing.
// The first two records from the serial node are not valid data
// but initialisation lines from the motor/servo driver
// Don't publish them as valid positions else we wipe out the last
// good retained position
// Use one of them to trigger the pausing of the motion detection
// in motion

// Initialise count if it doesn't have a value already
context.count = context.count || 0;
// Increase count for every msg flowing through
context.count += 1;

// If the count has gone over 2
if (context.count > 2) {
   // we have valid records now, so return to first output
   return [ msg, null ];
} else if (context.count == 1) {
   // This is the second record through, send this to the second output
   // we'll use this one to trigger a pause of the motion detection
   return [ null, msg ];
} else {
   // The very first record gets swallowed
   return [ null, null ];
}
For output one another function node just sets the msg.retain=true so that the last position reported will always be available to clients, then it is on to an ‘mqtt out’ node to publish the position status to the <stem>/output topic.
As explained in the code the one message that is sent to output 2 flows into an ‘http request’ node. The URL http://localhost:8080/0/detection/pause ‘pauses’ the motion detection function of the motion program that was started at boot time. Motion detection is always active from boot and must be paused if it is not required. In this application, only snapshots are used.
It is the other output out of the ‘serial in’ node that is used to ‘trigger motion snapshot’. It is another ‘http request’ node with a URL of http://localhost:8080/0/action/snapshot this tells motion to write the last image it took to disk as a jpg file. Motion has been configured to take images at 15 frames a second so the last image could be up to 66ms old and we could miss the event we were trying to capture. This is why there is a ‘delay so we don’t miss the action’ delay node set at 0.1 seconds to wait and ensure the event has occurred before we take the snapshot.
At this point we’ve only caused a snapshot jpg to be written to ‘disk’ (SD card in this case on a Raspberry Pi) So the last part of the flow has to retrieve and publish it.
‘watch for snapshot’ is a ‘watch’ node that uses fs.notify under the covers to keep an eye on a certain directory, where the snapshots are written, and report a change in the directory. There was an initial problem here, as motion wrote the jpg file to a directory, more than one change was seen and sent through the flow for each file. This was overcome by using a small ‘on_picture_save’ shell script within the motion configuration file. Each time a jpg is saved this script is called with the file name as a parameter.
#!/bin/bash
fname=`basename $1`
sudo ln -s $1 /home/pi/images/new/$fname
sleep 10
sudo rm $1
sudo rm /home/pi/images/new/$fname
This script symlinks the image into another directory waits 10 seconds and then deletes the original and the symlink. We assume that the file has been read and published before the 10 seconds is up. This means we keep the disk clean and don’t accumulate lots of images or symlinks. (Each snapshot image has a date, time and frame stamped name).
‘convert image’ is an exec node which calls a python script when it is told a change has occurred in the symlink directory.
#!/usr/bin/python
import base64
import commands
import sys
filename = '/home/pi/images/new/'+sys.argv[1]
try:
with open(filename):
imagestring = commands.getoutput('cat '+filename)
print bytes(base64.b64encode(imagestring))
except IOError:
print >> sys.stderr, 'symlink delete'
The watch node also reports on file deletes as well as creates so this script checks if the file exists when it is called. If the file doesn’t exist any more then it must have been a delete. If it can be read it is, into an string and then encoded into base64 before being printed onto stdout.
One more function node is needed to add the retain flag to this encoded image but also annoyingly ignore empty messages that flow through stdout even if the file didn’t exist
// Need to set retain flag on the image message only if
// it is an image and not a null
if (msg.payload.length == 0) {
   return null;
} else {
   msg.retain=true;
   return msg;
}
Finally the image is published to the <stem>/image topic through an mqtt node.
[…] working on it.I too was really buzzing after day and pleased to be going home with instructions and more to create my very own robot arm. I might even make two. I can always do with an extra […]
Pingback by What Good Tech Events Look Like | Kichwa Coders — 30/05/2014 @ 2:59 pm